
9 Painting Tips for Beginners
The Nuts and Bolts You Need
There are so many books and essays written on general painting and drawing techniques but sometimes the little practical things can make your time in the studio easier. Here are some day-to-day “nuts and bolts” painting tips for beginners from one of our favorite instructors, Johannes Vloothuis.
Check out Johannes’ watercolor (and more!) words of wisdom and works of inspiration.
Spritzing and More
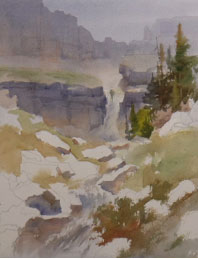
In this painting I forgot to make a provision of blank paper to indicate the running water where the rocks are in the center.
1. If you want to correct a watercolor mistake, the easiest way is to use a spray bottle. The stream
of water works like a pressure washer. To do this in a localized area, you can spray out a specific silhouette. First, cover the general area with masking tape and then use a utility knife to cut out the silhouette. This works really well for rocks or buildings. By avoiding staining colors such as Hooker’s Green or alizarin crimson, the aftermath of spraying will leave almost no residue of the previous paint.
2. If you intend to paint a risky subject, such as a portrait, there’s a product called Lifting Preparation, which is to be applied before you paint. You apply this directly on the watercolor paper. This leaves a protective film between the paper and pigment. Then you can spray off the paint easily and start over. It works like Scotchgard to protect fabric on furniture.
3. There’s also a product called Watercolor Ground that allows you to add a new layer of “watercolor paper.” Several layers will have to be applied before resulting in 100 percent opacity. You also can use this to prime another surface that isn’t watercolor paper, such as wooden boards or plastic or metallic surfaces.
4. There’s only one way to keep your paper from buckling. Mount it pre-soaked on a Guerrilla Watercolor board. The metal clasps pull the paper every inch and fasten 100 percent of the four sides, leaving no margin for buckling.
Pastels and Lines
5. There’s relatively new product called Pan Pastels that enables you to paint over an overworked area and even shift the color. The great thing about this is that the addition isn’t even noticeable because the dust particles are very small.
.jpg)
Dawn is Coming (oil, 12×16) by Johannes Vloothuis
6. For better control of wet-into-wet painting, before you apply the paint, squeeze the paintbrush bristles with your thumb and index finger at the ferrule with a damp cloth so it absorbs the excess water.
7. Experiment doing a complete painting wet-into-wet. To keep your paper damp enough for a long period of time, wet your paper, then place a thin wet towel under it. Follow the same procedure as if you were stretching the paper. Some of the water will evaporate, but the towel underneath won’t allow for total dryness. This technique works great for impressionist flowers.
8. Many artists complain about being heavy-handed, meaning they can’t easily make very thin lines. Try using paper business cards: rip them in different lengths, dip the straight sides of the cardboard into your paint and then stamp. This is very handy for creating cracks in wooden walls or rocks, thin branches on winter trees and barbed wire.
.jpg)
You can see subtle indications of sun rays behind and next to the last building at the right.
9. To indicate sun rays in a cloudy sky you can use an ink eraser and a ruler. Erase the paint, revealing “sun rays.” This won’t remove that much paint–just enough to create subtle sun rays.
Courtney Jordon